前言#
在上篇中,对于图形的旋转我们通过三角函数来计算旋转矩阵,这相当麻烦。本篇我们将通过 Matrix4 类 来简化矩阵计算,让 webgl 里的图形变化更语义化,并结合 js 来实现图形的自动旋转。
简化矩阵旋转#
在上篇中,我们使用旋转矩阵 gl_Position = u_xformMatrix * a_Position 来旋转图形:
//...
var radian = (Math.PI * ANGLE) / 180.0; // Convert to radians
var cosB = Math.cos(radian),
  sinB = Math.sin(radian);

// prettier-ignore
var xformMatrix = new Float32Array([
  cosB, sinB, 0.0, 0.0,
  -sinB, cosB, 0.0, 0.0,
  0.0, 0.0, 1.0, 0.0,
  0.0, 0.0, 0.0, 1.0
]);

//...
var u_xformMatrix = gl.getUniformLocation(gl.program, "u_xformMatrix");
gl.uniformMatrix4fv(u_xformMatrix, false, xformMatrix);
// draw...
能看到在矩阵变量 xformMatrix 中要定义复杂的矩阵,这很不方便。
其实可以通过工具库 cuon-matrix.js 来创建 Matrix4 类,通过它的 rotate 方法来创建旋转矩阵:
var xformMatrix = new Matrix4();

// Set the rotation matrix
var ANGLE = 90.0; // The rotation angle
xformMatrix.setRotate(ANGLE, 0, 0, 1);

var u_xformMatrix = gl.getUniformLocation(gl.program, "u_xformMatrix");

// 注意:在 gl.uniformMatrix4fv 方法中,最后个参数将传入 xformMatrix.elements 而非之前的 xformMatrix,xformMatrix.elements 才是矩阵元素类型的数组。
gl.uniformMatrix4fv(u_xformMatrix, false, xformMatrix.elements);

// draw...
显而易见,通过工具库,我们的代码变得更加简单,也不用接触晦涩难懂的三角函数和复杂的矩阵定义。
Martix4 API#
Marix4 类提供了很多常用的工具方法:
| api | 描述 |
|---|---|
| Matrix4.setIdentity() | 创建一个单位矩阵 |
| setTranslate(x, y, z) | 设置矩阵的平移 |
| Matrix4.setRotate(angle, x, y, z) | 设置矩阵的旋转 |
| Marix4.setPosition(x, y, z) | 设置矩阵的平移 |
| Matrix4.setScale(x, y, z) | 设置矩阵的缩放 |
| Matrix4.translate(x, y, z) | 矩阵平移 |
| Matrix4.rotate(angle, x, y, z) | 矩阵旋转 |
| Martrix4.set(m) | 设置矩阵的值 |
| Martrix4.elements | 矩阵的值 |
setXXX 和 XXX 的区别?我们看 cuon-matrix.js 的源码:
setXXX 设置的 xyz 不会参与计算,只是构建出变换矩阵,并写到 elements 中,供之后 xformMatrix.elements 使用:
// prettier-ignore
Matrix4.prototype.setTranslate = function(x, y, z) {
  var e = this.elements;
  e[0] = 1;  e[4] = 0;  e[8]  = 0;  e[12] = x;
  e[1] = 0;  e[5] = 1;  e[9]  = 0;  e[13] = y;
  e[2] = 0;  e[6] = 0;  e[10] = 1;  e[14] = z;
  e[3] = 0;  e[7] = 0;  e[11] = 0;  e[15] = 1;
  return this;
};
而 XXX 会基于上一步的变换矩阵,并通过计算算出最新矩阵,并将新的结果写到 elements 中:
Matrix4.prototype.translate = function (x, y, z) {
  var e = this.elements;
  e[12] += e[0] * x + e[4] * y + e[8] * z;
  e[13] += e[1] * x + e[5] * y + e[9] * z;
  e[14] += e[2] * x + e[6] * y + e[10] * z;
  e[15] += e[3] * x + e[7] * y + e[11] * z;
  return this;
};
这两个方法都会将最后的矩阵4*4结果写到 elements 中,区别是 XXX 方法会计算一次。
很绕脑,不用担心,下面在复合变换中再加以说明。
复合变换#
先平移再旋转#
比如最开始时三角形在原点,现在我们需要对它往右平移 0.5 个单位,再旋转 60 度:
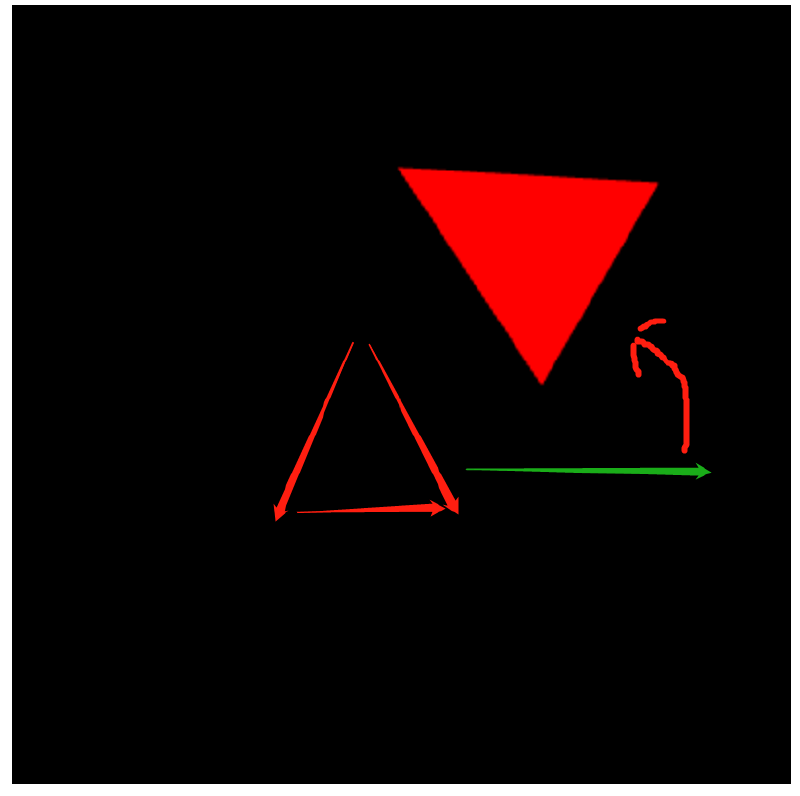
大致的过程:
我们是要先平移,再旋转,所以第一步是先计算平移的坐标:
(x1,y1,z1) = 平移矩阵 * (x0,y0,z0)
第二步再计算旋转坐标:
(x2,y2,z2) = 旋转矩阵 * (x1,y1,z1)
通过等式带入,我们可以得到:
(x2,y2,z2) = 旋转矩阵 * 平移矩阵 * (x0,y0,z0)
这其实就对应了顶点作色器的程序:
gl_Position = u_xformMatrix * a_Position;(旋转矩阵 * 平移矩阵 == u_xformMatrix),知道这些后,我们再看通过 Matrix4 类 简化后的代码:
// 使用工具库,构建出矩阵对象
var modelMatrix = new Matrix4();

var ANGLE = 60.0; // The rotation angle
var Tx = 0.5; // Translation distance

// 计算出旋转矩阵(注意这不是先旋转) ==>  定义出了旋转矩阵
modelMatrix.setRotate(ANGLE, 0, 0, 1);

// 将旋转矩阵和平移的坐标计算,计算出(旋转的)平移矩阵  ==> 即:旋转矩阵 \* 平移矩阵
modelMatrix.translate(Tx, 0, 0);

// Pass the model matrix to the vertex shader
var u_ModelMatrix = gl.getUniformLocation(gl.program, "u_ModelMatrix");先旋转在平移#
// 计算出平移矩阵
modelMatrix.setTranslate(Tx, 0, 0);
// 平移矩阵*旋转矩阵
modelMatrix.rotate(ANGLE, 0, 0, 1);
总结下:代码 api 调用和实际逻辑是反着来的。
添加动画#
本例,示意如何通过 js 来让这个三角形随着时间自动旋转:

首先我先定义一个随时间推移而变化的角度方法:
var g_last = Date.now();
function animate(angle) {
  // Calculate the elapsed time
  var now = Date.now();
  var elapsed = now - g_last;
  g_last = now;
  // Update the current rotation angle (adjusted by the elapsed time)
  var newAngle = angle + (ANGLE_STEP * elapsed) / 1000.0;
  return (newAngle %= 360);
}
每当触发 requestAnimationFrame 渲染时,将调用 tick 方法,从而绘制图形:
var u_ModelMatrix = gl.getUniformLocation(gl.program, "u_ModelMatrix");

var currentAngle = 0.0;
var modelMatrix = new Matrix4();

// Start drawing
var tick = function () {
  currentAngle = animate(currentAngle); // Update the rotation angle
  draw(gl, n, currentAngle, modelMatrix, u_ModelMatrix); // Draw the triangle
  requestAnimationFrame(tick, canvas); // Request that the browser calls tick
};
tick();
我们会将 Matrix4 矩阵变量对象和顶点着色器中的 u_ModelMatrix 变量传入 draw 方法中,在每次触发 tick 时,计算最新的旋转角度,从而计算旋转矩阵,让 webgl 重新绘制图形达到了图形旋转的效果:
function draw(gl, n, currentAngle, modelMatrix, u_ModelMatrix) {
  // Set the rotation matrix
  modelMatrix.setRotate(currentAngle, 0, 0, 1); // Rotation angle, rotation axis (0, 0, 1)

  // Pass the rotation matrix to the vertex shader
  gl.uniformMatrix4fv(u_ModelMatrix, false, modelMatrix.elements);

  // Clear <canvas>
  gl.clear(gl.COLOR_BUFFER_BIT);

  // Draw the rectangle
  gl.drawArrays(gl.TRIANGLES, 0, n);
}